One of the most important technical health aspects of your blog is to ensure your image file sizes are never bigger than they should be.
Overly big image files means slow blog.
And slow blog means worse rankings on Google.
It also generally just helps the user experience when pages load fast and images appear right when they’re needed. Since images are often one of the biggest sources of load times, it’s a great idea to optimize your images as much as possible.
Here’s how.
Option A: Optimize images before upload
This is arguably the easiest way to optimize your images.
You can get started with this right away even if you just started blogging.
By choosing the right file formats and/or compressing your images before uploading, you will be grabbing a lot of the low-hanging fruit of image optimization.
Firstly, it’s essential to use the right file formats. Most of the time that will be JPEG but occasionally that may be PNG.
- JPEG is perfect for photos or complex illustrations with lots of detail
- PNG is usually better for basic illustrations (simple shapes/colors), logos, or type
Don’t use PNG for photos or you might end up with a file 10X bigger than it needs to be.
When saving your JPEG files in your image app, you’re typically presented with a quality slider with values ranging from 0 to 10. Don’t set the quality to maximum! Choose something like 6 for a decent balance between image quality and file size.
JPEG is a ‘lossy’ file format which means that the image will visibly degrade the more you compress it. You can try setting a JPEG to quality 1 or 2 and you’ll surely see the image become much less sharp and have lots of small swirlies in it where the data gets corrupted.
Sometimes it’s okay to go to a quality setting as low as 4 (if you’re image is only used as a background for example) but 6 or 7 is best for any photos that will be front and center.
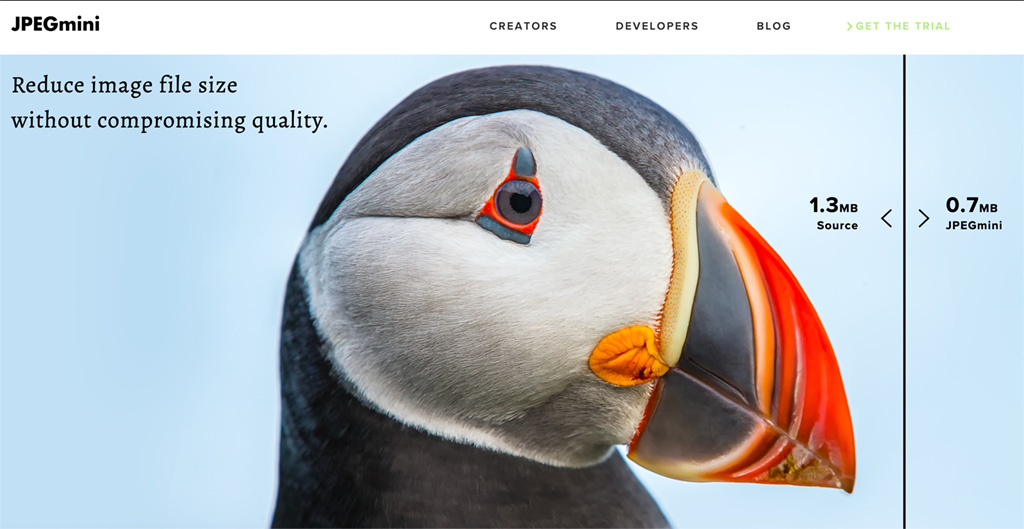
Another way of saving JPEGs at the right quality level is using an app like JPEGmini. It automatically chooses the setting for your photos/images at just the right level where it doesn’t degrade quality in a noticeable way.
I used this for many years as it’s a quick and easy way to compress your JPEGs. You can drag files into the app and they’ll be instantly compressed.
JPEGmini also has a Lightroom plugin that lets you apply it to photos when exporting from Adobe Lightroom. That’s super handy if you’re a photographer.
Option B: Use a WordPress plugin
This option will burden your WordPress site with an extra plugin and it will make image uploads a little bit slower, but the advantage is that you can install it once and then forget about it.
Smush is a popular image optimization plugin that I’ve used on my blog as well. It can process all your image files and make them a fair bit smaller without noticeable quality loss.
Smush normally does this whenever you upload new images, but you can also tell it to go through your existing image library to optimize it.
It’s a free plugin but there’s also a Pro version with extra features.
I’ve had the Pro version for a while as it enables the option of using the webp format. This is a file format that’s newer than JPEG and PNG and that results in smaller files. Google Sitespeed reports will recommend you to use webp if you’re not. The one tricky bit with webp though is that older browsers don’t support it, so you always have to have both webp and jpeg/png versions of images at the same time. Smush can take care of this automatically, only showing webp versions on browsers that can handle it.
Option C: Optimize images in the cloud
This is a more advanced option as you’ll need to set up Cloudflare, which does get quite technical (and the setup of it is best outsourced if you’re not familiar with the details).
But I also think it’s the best option for reasons I will explain.
What’s Cloudflare? It’s a suite of tools that sits between your blog’s hosting server and the internet. So if a user requests to see your blog, the request will first pass through Cloudflare. Among the solutions that come with Cloudflare are protection against spam/attacks, image optimization, SSL encryption, and other site optimizations.
Cloudflare includes a service called Cloudflare Polish that does essentially what Smush Pro does: it automatically compresses images so their file size is smaller. Except it does it without needing a WordPress plugin. Everything is done on Cloudflare’s server.
But more than that, it has an automatic service called Cloudflare Mirage. This makes numerous versions of every image so that it can dynamically serve the best version depending on the user’s connection and device type.
For example, if the user is on a phone and has a poor internet connection, Mirage will automatically serve a more compressed or lower-resolution version. This user is not looking at the page on a widescreen desktop monitor anyway, so they don’t need the best-quality version.
For example, if you have a 1000px by 1000px image that you’re only displaying at 100px by 100px, then Mirage will create a new copy of the image at that exact size, and it will be served up to the right users automatically. Mirage is especially a huge boost for mobile, making your blog faster on mobile devices.
Moreover, Cloudflare can automatically generate WebP and AVIF versions of your images. These are much newer file types than PNG or JPEG and so their file sizes can be much smaller. Not all browsers support these file types yet, but Cloudflare can automatically detect if they do, and then serve up either an AVIF, a Webp, or just the JPEG or PNG that you uploaded.
(Smush also supports WebP, but it doesn’t support AVIF, which is the latest standard.)
The final piece of the puzzle is Cloudflare’s CDN or content delivery network. Normally, your blog’s images will be loaded from wherever your web hosting server is located — say, New York. That’s great if your user is in New York, but less so if they’re in Sydney.
A CDN will keep copies of files (like images) in various server locations around the world so that the user is automatically served these files from the location nearest to them. It uses a caching system, so that files that don’t change often (like static blog posts) are served up faster.
Since all these services work seamlessly together in one suite, I think Cloudflare is the perfect solution for image size and site speed enhancements.
Cloudflare is honestly overkill for a new blog. But if you get at least hundreds or thousands of visitors per day, I think it’s highly worth it.
To get Cloudflare’s image optimization, you need at least the Pro version of Cloudflare which costs $20/month. However, my website is hosted with Cloudways, which offers its customers the Enterprise version of Cloudflare for just $5/month, which is a crazy good deal. Similar deals are offered by other hosts such as Big Scoots.
Once I realized I could have all of Cloudflare’s features at this price, for less than Smush Pro costs per month, I decided to switch over completely. And it’s already made a noticeable difference in my Google PageSpeed scores.
So there you have it, three ways to keep your images nice and optimized.
If you’ve only just begun blogging, the most important things you can do are using the correct file formats (JPEG or PNG), not using image dimensions that are way too large for your page, and not using the highest quality settings when saving JPEGs.
When you’ve been blogging for a while, you can consider optimizing things a bit further, such as with cloud solutions like Cloudflare, which may help you get that perfect score in Google PageSpeed Insights.